
This Balayage technique works best on natural
(non colour treated) hair. However, using Decolour Stripper, the Balayage method can now be used on colour treated hair to partially strip hair colour prior to recolouring to effectively create a multi-tonal base in a soft, natural way.
DIY Balayage Tutorial for Medium to Light Brown Hair
DIY Balayage Tutorial for Medium to Light Brown Hair
This tutorial is designed for current medium to light brown bases who
want to achieve a natural medium blonde base (either cool or warm). Please refer to the end of this blog post for my notes on DIY Balayage on brunettes and black hair.
You will need
- Tint Bowl
- Brush
- Decolour Stripper
- Permanent Colourant (see colourant recommendation chart)

How to Create Balayage Hair at Home
Make sure the hair is clarified (washed with a sulphate & silicone free shampoo such as baby shampoo) to ensure it's 100% free of styling products and conditioning residue, this will allow the treatment to work fully. Most importantly dry hair into your usual hair style, this is
crucial to ensure good positioning of your balayage.
Home Balayage Tutorial Preparation
- Mix only 50% of your Decolour Stripper elements in the tint bowl and ensure only the tip of the tint brush is dipped into the product. You can keep the remaining 50% of product in their separate containers and save them for another treatment at a later date.
- Working on dry hair, use the pointed end of the tint brush and segregate a thread (about 1cm wide) of hair from the front of the parting. Pull the thread outward and starting at the end of the hair section, begin coating in the Decolour Stripper, working up the section and applying slightly less stripper at the root area. Go Along the parting and continue creating these streaks.
- Once you have applied the threads along the parting, begin using the tip of your tint brush to pull out and coat slightly thicker sections of hair in the stripper (1.5cm-2cm wide) from underneath your parting. Again, apply the stripper to the mid lengths and ends of the section first and apply less to the root area.
- When choosing chunks to coat on the underneath of your hair, you can coat sections as wide as 3 cm if you wish.
- Work through the hair taking these slightly wider sections from both the sides and the back of the hair.
- Once you have applied the stripper to your sections, do not comb through as you want to leave a lot of your darker base intact.
- Once applied, leave the Decolour Stripper to develop on the hair for between 45 minutes and 1 hour before rinsing as instructed.
- Once you have developed and rinsed off the Decolour Stripper, fully towel dry the hair. You will now notice the overall colour looks streaky and the tone may be warm, this is normal.

You have now created the base for your balayage look, next, you need to select the correct shade of permanent hair colour for your desired look, below are some suggested colours that you might like. Further instructions are below.
What is a Camouflage Shade?
Camouflaging is a method of applying a permanent hair
colourant to a pre-lightened, highlighted or Balayaged base to deepen the
lightened areas but retain any deeper (unlightened) parts. Camouflaging mutes the overall colour and
creates a richer multi tonal result without hard edges as seen when the hair is
just lightened and left.
DIY Balayage Selecting the Correct Shade
Blonde Hair Colour Suggestions
DIY Balayage on medium to light brown shades wishing to go blonde with their balayage, might want to take inspiration from one of these fabulous ladies from Elle's honey blonde to J-lo's ash blonde.

Red Hair Colour Suggestions
If you want to be bold with your colour, why not go for a red shade? Here's my colour recommendations for auburn to vibrant red shades.Whether you want a subtle, Isla Fisher red to a vibrant, striking Rhianna red, here are some suggestions.

TOP TIP: If you need a hand choosing the right hair colour for your requirements, this is an easy way to understand what that shade aims to achieve in your hair colour.
Natural = will mute warmth but retains tones already present in the hair.
Ash = neutralises warmth and creates a natural looking blonde.
Golden = Adds to the gold already present to create a soft copper effect.
Copper = Creates deep, warm copper shades.
Red = Creates vibrant red.
DIY Balayage Tutorial: The Hair Colouring Stage
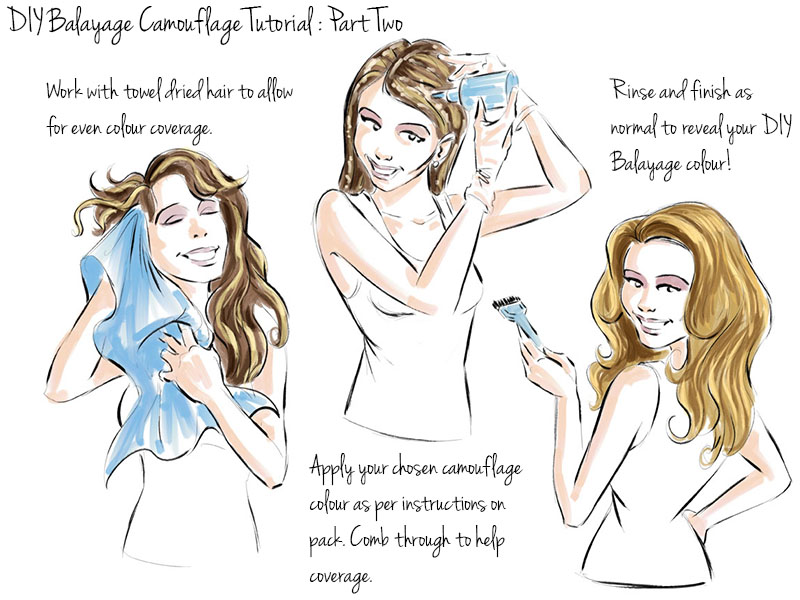
- Mix and Apply your camouflage colourant as per manufacturers instructions, apply to towel dried hair as this will enable the product to cover the hair evenly.
- Comb the colourant through the hair to ensure your whole hair is fully covered in colourant.
- Leave the product to develop as per manufacturers instructions, rinse and finish.
- Dry and Style your hair as normal.
- Your Balayage Stripping is now complete!
If you wish to build a lighter base and create further multi-tones in
the hair, wait 4 to 6 weeks and repeat the process.
DIY Balayage on Dark Hair Colours
If you apply this technique to a deeper medium or darker
brunette or natural black shade you need to remember to re-colour only with
brunettes shades with a 6.0 (dark blonde), 5.0 (light brown), 4.0 (medium
brown) and 3.0 (dark brown) base level.
If you are currently very dark and attempt this method with the
colourant shades outlined the result will appear streaky as the chosen colourants
applied will be too light for the level of pigment removal you can obtain
during your Balayage Stripping.

No comments:
Post a Comment