Showing posts with label Tutorial. Show all posts

Friday, 14 September 2012

DIY Coconut Oil Deep Conditioning Treatment


Dry and damaged hair can happen due to a number of reasons ranging from chemical treatment to heat exposure. When the cuticle layer is damaged the protective shield around the hair is broken exposing the hair's natural protein (keratin) to risk of depletion from washing and general styling.  This can then cause the hair to feel dry and become unmanageable.

Coconut Oil has a molecule small enough to filter inside the hair fibres and fill any gaps in the hair. Using a pure Coconut Oil on the hair can assist in recovering hair health and reversing dryness. 

It's important to understand that very damaged hair has been destroyed and cannot be salvaged, however if the hair is simply feeling dry a weekly treatment with Coconut Oil can make all the difference.

Pros for Coconut Oil Hair Treatments

Coconut Oil is a rich fatty substance that adds extreme moisture to the hair and can filter inside the hairs fibres and contribute to genuine hydration of the cortex (the hair's centre).

Cons for Coconut Oil Hair Treatments

It's unbelievably greasy, this is not a cosmetic composition - it's purely natural.  You must only use a very tiny amount (less than a teaspoon for long hair).  If you overload the hair with Coconut Oil it will become incredibly greasy and you may find this grease difficult to remove.

How to Give your Hair a Coconut Oil Treatment


1.  Firstly wash the hair in baby shampoo, do not use your regular shampoo as it may contain conditioning polymers (silicones) that cause the Coconut Oil to sit on the surface of the hair rather than penatrate it.

2.  Towel dry the hair and take a teaspoon sized amount of the Coconut Oil and rub vigorously in your palms to heat up, apply throughout the hair and comb through to the midlengths and ends.

3.  Wrap the hair in some cling film and leave for up to 1 hour.

4.  Before rinsing, take a small amount of baby shampoo and work through the hair, this will begin lifting the excess Coconut Oil from the hair.

Remember: oil and water do not mix so you may find if you just proceed if you trying to rinse the Coconut Oil out you may find much remains within the hair and leaves it greasy.  Working some Baby shampoo into the hair before rinsing will begin lifting the excess grease out of the hair.

5.  After working some baby shampoo through the hair, apply a very small amount of water and lather.  Once lathered proceed to rinsing and then give the hair one to two full washes with the baby shampoo.

6.  Do not condition the hair as it is not necessary.

If you you have applied too much Coconut Oil to the hair and it feels greasy, simply wait for the hair to dry and comb baby shampoo through it, leave for 10 minutes and rinse out.

Coconut Oil is an excellent weekly conditioning treatment for dry or naturally coarse, curly hair types.  Due to the small amounts of the oil required for use in each application one tub could last you well over a year.

I recommend Coconoil or you can visit Holland and Barratt for a selection ranging from £4 to £17.

If you have any questions on hair please leave me a comment on Facebook and I'll get back to you as soon as I can.


Friday, 7 September 2012

How to Create Vibrant Red Florence Welch Hair


So many people want to display a vibrant permanent red shade but often find this particular colour a difficult one to achieve for a whole variety of reasons.

The biggest problem with red hair colourants (in my view) is a lack of understanding as to the level of depth in the actual colourant.  If a red shade uses a brown as its base (such as deep auburns and mahogany's) and is subsequently applied to hair that is already fairly brunette the result will be much darker than expected

Remember, red is a tone not a base – meaning the more base which is presented in the hair (or added to it) the darker it will become and the less the (red) tone will be displayed.


The Perfect Base for Red Hair Colouring

In order to achieve a true vibrant red shade (in a natural brunette) the base colour must (initially) be a medium blonde or copper.  This will allow for the red pigments to fill the inside of the hair and display the colour 100% accurately. 

The key to retaining a good redhead shade is to try to avoid pre lightening with traditional bleaches (designed for blonde results) and use only non-ammonia products to lift up the base.

In addition, very bleached or pale hair should always be pre-pigmented before applying a permanent red shade.  Pre Pigmenting will fill the empty hair with additional red colour molecules and these pigments can form a layer underneath the permanent shade (applied) which not only reduces fading but also add to the vibrancy of the overall shade.


The Florence Welch Red Shade

The Florence Welch shade is a really popular example of the ‘vibrant redhead’.  Florence’s colour is prone to changing in intensity from being a more muted auburn to a fiery pure red.  This demonstrates that Florence (herself) has issues with both getting the vibrancy right in her colour and finding a shade which doesn’t slip out too aggressively during washing.

I would imagine that Florence’s natural base is a medium blonde to auburn, for this reason she would be able to apply a colourant directly onto her hair without prior stripping.  However, for the purposes of this how-to I am explaining how to achieve the shade on darker light to mid brunette bases or for those with lighter (natural) bases who have been previously colouring to achieve the look.

You will need
  • ·         Decolour Remover or Stripper (depending on camouflaging shade desired)
  • ·         Garnier Nutrisse Ultra Colour Fiery Red  - 6.60
  • ·         Colour Restore Deep Red (if using Decolour Remover)

Step 1 – Removing or Stripping

Remember, this how to is designed for brunettes (who wish to achieve a vibrant red) or lighter bases who have overlaid previous red colourants and achieved a darker than expected result.

Step 1 - For natural and artificially coloured dark blondes to brunettes

The key is to firstly strip the hair of both base shade and artificial colour molecules.  In order to obtain a true vibrant blanket of red you must start with an even lighter canvas that will display the colour effectively. I've outlined my step by step instructions for stripping hair colour below, or you can watch my tutorial.


To strip the hair

·         Firstly wash several times and towel dry. Comb the hair smooth and make sure it’s parted correctly.

·         Now mix the Decolour Stripper as instructed and apply firstly to any areas which appear heavy or dark.  These will typically be the mid-lengths and ends.  Once you have applied to these darker areas leave for 10 minutes.

·        After 10 minutes, apply the remainder of the Decolour Stripper to the damp hair and comb through evenly from roots to tips, the hair should be damp as this will enable the stripper crème to work evenly throughout the hair.

·        Once the crème is combed through the damp hair (as you would a conditioner) leave to develop for a further 20 minutes and proceed to rinsing and applying the conclude balm.

·         After stripping you should notice your hair is a lightened coppery shade.  This is good as you now have a base on to which to apply the Fiery Red hair colour.

Step 1 - For natural but previously artificially coloured medium blonde shades


Repeat the above steps using Decolour Remover, but ensure you give a full development (once the crème is applied throughout the hair) of 60 minutes.  A full development of remover will ensure all the artificial colour molecules are eradicated and the natural (light) base is exposed.

After using Decolour Remover you cannot apply a peroxide based shade for 7 days.  Therefore, to achieve your desired ‘Redhead’ effect, follow the removal immediately with an application of Colour Restore Deep Red.  This will create a short term ‘redhead’ result and will also act as a pre-pigment.

After 7 days (or so) I would recommend applying a second Colour Restore Deep Red application (to further pre-pigment the hair) and then proceed to applying the permanent colourant as outlined below.

Step 2 – Applying your permanent redhead shade

Garnier Nutrisse Ultra Color Fiery Red 6.60 would be my recommendation for achieving the Florence Welch shade at home.

REMEMBER: If you have used Decolour Stripper to create your new canvas you can proceed to the colour step immediately, however if you have used Decolour Remover (to expose a natural lighter base), please ensure you immediately re-colour with Colour Restore Deep Red (as outlined above) and wait 7 days before applying this permanent colour.

I would recommend you apply the Fiery Red shade to slightly damp (non-dry) hair as this will ensure the colourant goes onto the hair smoothly.

When applying, use a tangle comb and work the colourant evenly into the hair and develop for the instructed development time.

Step 3 – Maintaining a vibrant red shade

It’s crucial to maintain red shades with appropriate haircare products.  Using a red enhancing shampoo will ensure the hair is cleansed but the artificial red colour molecule is not depleted in the hair by the regular washing.  I would recommend using ‘John Freida Radiant Red’ shampoo as your home care solution for this purpose.  It is also worth giving your hair a weekly (or bi monthly) ‘Colour Restore Deep Red’ infusion to retain the overall red shade and vibrancy.


Step 4 – Regrowth Application

If you are a natural brunette, I would recommend a monthly (to 5 weekly) re-growth application of the Garnier Ultra Colour Fiery Red 6.60, as soon as the hair demonstrates a very small amount of re-growth close to the scalp.  Scalp heat will accelerate the strength of peroxide and offer more of a lift in the base shade.  If the dark roots are allowed to grow through too much, this scalp heat will be less effective and not lift the overall base shade to a level which will display red vibrancy.  Therefore, subsequent red applications may start appearing too dark at the top sections as the hair grows.

Whenever you conduct the ‘redhead’ re-growth application, always apply with a tint bowl and brush to the new growth only.  This will ensure precision of application.  Try to keep your head as warm as possible and this will also aid lifting of the base shade and a good overall display of the red colour.

Do not pour the entire contents of the colourant over the head, as you will subject the previously coloured hair to unwanted chemical treatment.  However, 10 minutes before the end of the regrowth development, wet a tangle comb and begin working that root colour through to the mid-lengths and ends.  This will ensure the old hair colour is refreshed and the red shade remains fully vibrant. 

Monday, 20 August 2012

How to Create Cool Lights with Colour Restore Cool Ash


Creating Ultra-Cool Toned Highlights with Colour Restore Ash

For deeper and more brunette natural bases highlighting the hair can evoke several tonal issues.  Many people find - as darker hair lightens - a substantial degree of heavy warmth can be revealed which can have a rusty or carroty hue which is often hard to disguise with blue shampoos.

A great deal of brunettes have an underlying cool skin tone (this is irrelevant of ethnicity) which can clash with strong (unwanted) warmth within the hair, often making the skin tone look sallow or buttery.   If you are a natural cool toned brunette and wish to have highlights you should optimize the presence of ash within your shade.


Often applying a permanent ash toned colourant to the whole head (after highlights) can cause the darker (non-highlighted hair) to lighten and expose further warmth.  The best approach is to highlight darker hair with bleach and then use a high ash toning product such as Colour Restore Cool Ash.

Colour Restore Cool Ash contains a deep level of neutralising ash and silver pigment which will turn lightened coppery or warm blondes to a solid neutral to high beige tone.  These cool toned highlights will intermix with the natural (darker) depth and created an overall ash shade which harmonises with skin tone and any (original) natural hair colour present.

There are two methods you can apply and work with Colour Restore Cool Ash:-

Using Colour Restore Cool Ash for Cool Lights At Home

You will need:-


1. Always start with dry and clarified hair. Put on the highlighting cap and pull through a mixture of hair throughout the top and side sections of the head.

2. Mix and apply the bleach and leave to develop (as instructed in the Jerome Russell kit). Darker natural bases will often require around 70 minutes to lighten the hair sufficiently.

3. Once the hair has lightened sufficiently, leave the cap on and begin rinsing off the bleach with warm water. Do this for around 5 minutes.

4. With the cap still on, apply the Colour Restore Cool Ash to the highlights and work through the hair. Leave for around 5 to 10 minutes and remove the cap. The Colour Restore Ash contains a conditioning base and will enable the cap to be removed smoothly.

5. Apply a small amount of the Jerome Russell tone and condition throughout the hair and finish.

Colour Restore Cool Ash will work relatively quickly to tone freshly bleached areas of the hair. However, if you desire a deeper ash you can re-apply the product and leave for a full 20 minutes. Colour Restore Cool Ash can then be used as part of your regular hair care regime in conjunction with a blue shampoo to keep your highlights ultra-cool.

Using Colour Restore Cool Ash At the Salon


If you have your highlights undertaken in a salon with bleach and foils, you can take Cool Ash to your appointment.   

The colourists will just need to highlight your hair with bleach and foils in the usual way.

At the backwash, after removing the foils and rinsing for several minutes, your colourist can firstly shampoo with their regular Colour rinsing cleanser and then apply Cool Ash throughout the hair (as a conditioner) and leave for 10 minutes.   

The hair will then be toned and conditioned.   You can then intensify the cool tone (at home if you choose) by applying Colour Restore Ash as either a 2 minute conditioner (following application of a regular use silver shampoo) or a once weekly for a 20 minute intense tonal application.


Some Pointers for using Colour Restore Cool Ash
  • Colour Restore products work exceptionally well on newly highlighted and bleached hair. However if you apply a conditioner immediately prior to Colour Restore it will create a barrier on the hair which will prevent the pigments from entering. For Cool Lights methods always apply Colour Restore immediately after rinsing the bleach..
  • Colour Restore Cool Ash can be built up in the hair with regular use as a standard conditioner. Be aware that very silicone rich shampoos could also create a barrier which prevents the product working, so for best results use a blue or clear shampoo for deep tonal absorption immediately prior. 
  • If you have achieved an unwanted warm result from an artificial permanent hair colourant. Remember many colourant products include a sealant conditioner to prevent the artificial colour from fading. Therefore, this sealant conditioner must be removed from the hair (with a clarifier) prior to using Colour Restore. 
  • Colour Restore Cool Ash will not damage the hair and contains no peroxide or ammonias and has a conditioning base. You can use as much or as little as you wish, if you find the tone is becoming too cool or silverized simply use a clarifying shampoo several times to reduce the pigment.


Friday, 3 August 2012

Clarifying Hair and Silicone Damage

What are Silicones?

Many people still don't realise that many hair care products contain polymers (including silicones) which sit on the outside of the hair shaft and can create a barrier.  Silicone molecules can be the worst for this because many are not water soluble so cannot just be 'washed off' in one go. You can spot silicone ingredients in products by looking for ingredient names ending in 'cone'.


Silicone Build Up in Hair

If you are using different shampoo and conditioning brands and then following with another styling product - which again contains silicones you could have three different types of silicone molecule on the hair.  Washing the hair with another silicone based shampoo will then add further silicone molecules onto the hair and result in the hair suffering heavy build up.
What is Silicone Damage?

If you use heated styling products such as hot irons you can seal this build up onto the hair, gluing down the cuticle layer, trapping in the silicone and making it difficult to remove.

In some instances a straightening iron can reach such a high temperature that the silicone molecule actually reaches boiling point and melts onto the hair shaft.  Please be aware this is the fault of the straightening iron and not the silicone and quite frankly if you are using a devise which gets so hot it can melt silicone imagine what it's doing to your hair fibres and proteins!

When hair suffers build up and/ or silicone damage, the surface is closed off to hair alteration meaning that colourants, perms, colour removers and even bleaches might not work on your hair.

If you are worried about silicone build up, hair should be clarified once a week to enable the hair to breath and function in conjunction with the products you are applying.

Hair Clarifying Tips

1.  Try using a baby shampoo on every third wash to prevent build up.

2.  Keep conditioner use to only the mid lengths and ends of the hair and use sparingly.

3.  Once a week use a Clarifying product such as Pin Up Clarifying Shampoo.  It's designed for use prior to perms and chemical services but is great for removing weekly build up  finish with the Pre Perm 'Leave In' conditioner as a light hydration product.


4.  For a deep clarifying treatment put two spoons of bicarbonate of soda into a mug of warm water.  After using a Clarifying Shampoo, pour the Bicarb rinse through the hair and comb through.  Leave for 10 to 20 minutes and rinse off.  The bicarb will help to break down any surface residue and over time can help with severe build up.

5.  If you have suffered silicone heat damage, clarifying the hair may not reverse the situation.  I would recommend you refer to Philip Kingsley products for your hair type for at least six months. Philip Kingsley products will not coat the hair any further and (overtime) will hydrate if the residue begins breaking from the hair.


Remember, if hair is very damaged from heated build up, the middle of the hair could be highly fragile.  Whilst it may look shiny on the outside, this shine is often synthetic and if a chemical product is successful in breaking through the build up the hair and entering inside, the hair could break due to its fragile state.  Always strand test before undertaking such treatments.


Friday, 27 July 2012

How to Create Chocolate Brown Catherine Zeta Jones Hair from Black Hair

Many people find themselves in the murky territory of black hair when simply trying to achieve a ‘Chocolate Brown’ shade. Continually trying alternative browns or constant recolouring ultimately leads to a build-up of colour which becomes black, heavy and artificial looking.

By contrast, some individuals - who have actually chosen to sport raven black hair - often look to find a way to reduce the edge of the black and create that effective Chocolate Brown shade. The below method uses Catherine Zeta Jones shade as a destination and explains a way of partial colour removal to reduce a black shade to a softer deep brown


The Catherine Zeta Jones Shade

Catherine’s natural colour is known as a 4.0 ‘Medium Brown’ which displays on the head as a dark brown.   Her colourist would avoid using any shades too much darker than a 4.0 as otherwise the hair would start becoming ‘flat’.  In addition, a very subtle violet tone is possibly added to the overall base shade to create the richness but counteract any copper hue which is prone to appearing in darker, coloured brunette shades.

If you have unwanted black hair colour and you are wishing to display a more ‘brunette’ look, try undertaking a partial colour removal or stripping and then ‘camouflaging ’ the hair with a new lighter brown base shade.  With unwanted blacks the tendency is to try to remove the entire shade and start again, however working with the black (as a base colour) can actually create quite good results.

What you need

  • Hair Clarifier
  • Decolour Remover or Decolour Stripper (read below for recommendations)
  • Tint bowl and brush
  • 5.0 (light brown) hair colourant either semi-permanent or 8 wash (see recommendation)


Do I need Decolour Stripper or Decolour Remover?

My recommendation would be that if you have recently coloured your hair black or obtained an unwanted black hair colour result through recent colouring, use Decolour Remover.  The Decolour Remover will take out the black on any areas it is applied to and you can then subsequently apply an 8 wash brunette shade to evoke your colour result, prior to switching to a permanent version in the future.

If you have a long term black colour or have suffered colour build up (from constant recolouring)  I would recommend using Decolour Stripper. If you are looking to completely remove all traces of black hair, please refer to my previous blog post on removing black hair dye for tips.

Step 1 – Clarifying

With black hair and colour build up it’s crucial to clarify the hair several times before even attempting a removal, stripping and re-colouring. Quite often the cuticle is coated in conditioners, styling products and residue which will prevent the subsequent treatment working effectively.  I recommend Pin Up clarifier, whilst it’s designed for pre perming clarifying  it’s also great for use prior to colouring, removal or stripping, use this without a conditioner to remove unwanted product build up.

Step 2 – Removing or Stripping

With partial removing and stripping the idea is to keep some of the black base in there and introduce a lighter brown which will blend and create an overall deep brown, that will be multi-tonal and quite natural looking. This technique is quite similar to Balayage, which you can read about here.

Mix your chosen Decolour in a tint bowl. You should only need to mix 50% of the product as you are not required to cover every hair on the head.

Brush the hair thoroughly.  Dip the tint brush into the Decolour and take a panel of hair from the parting and starting at the mid-lengths and ends begin coating this panel in the product.  

Pay less attention to the root areas, and only lightly brush the product onto these areas – always ensure the majority of the crème goes onto those mid lengths and ends.  Roots will traditionally remove or strip easier, so require less of the crème than the stubborn mid lengths and ends.

After applying the first panel, next take a second panel of hair on the opposite side of the head and repeat, and then begin taking panels from the under sides of the hair and back sections.

The aim is to coat panels of hair throughout the hair, but not apply the product to the hair in its entirety.   Remember, you also want to make sure there are (untouched) panels of black hair still remaining.


Step 3 – Developing

Once you have applied the crème to panels of hair throughout the head leave to develop for 40 minutes.  

If using Decolour Remover do not cover the hair in cling film (as instructed in the box) as it will squish down the product into the untouched areas.  Simply leave the product to develop as it was applied to the hair.

After 40 minutes, wet a tangle comb and begin combing the hair through (evenly) from root to tip.  At this stage you can begin combing the remover or stripper into the untreated black hair.  

When the crème is fully combed through develop for a further 20 minutes.  Combing the crème through the hair will gently shift a layer of the remaining black hair colour to reduce the shade slightly.  

Once the further 20 minutes have passed you can rinse and remove the crème from the hair.

Step 4 – Camouflaging

Camouflaging is a method of re-colouring pre-lightened, highlighted or lifted hair with a new hair colour.  After Camouflaging the hair will take on the new shade, but have varying translucent depths due to the previous lifting method applied.  

Camouflaging prevents hair looking flat or heavy which is a common pitfall of block colour.

At this stage (and prior to applying the new colour), your hair should be displaying a mixture of varying depths and the previous removal or stripping should be noticeable.  

You now need to re-colour your hair.

What Shade Should I Recolour With?

If you used Decolour Remover for your panel method I would recommend using Nice and Easy Non- permanent 765 Medium Brown.   This is a temporary shade, but can be used immediately after colour removal without risk of re-oxidation.  If you wait several weeks (for this shade to fade) you can then use the permanent version in the same brand.


If you used Decolour Stripper for your panel method I would recommend using John Frieda Precision Foam 5N Natural Brown.  This is a permanent shade and can be applied immediately after stripping the hair.

Step 5 – Upkeep

After you have applied your subsequent colour you should find your hair now appears a deep chocolate brown.  Whilst the hair will still be deemed a ‘dark shade’ it won’t have the black appearance and will look much softer.

If you wish to soften the hair colour further, I would recommend waiting 6 weeks and then repeating the above exercise with the remaining 50% of the remover or stripper you have left over and sticking with the same shades as outlined above.  A second partial removal, stripping or re-colouring will reduce the depth further and create a softer brown still.

When maintaining this chocolate shade in the future, apply to re-growth areas only (with the tint bowl and brush) and do not pour the contents of the colourant over the entire head.  Doing this will cause the hair colour to build up again and over several months start becoming darker and possibly black again.

Another Tip

If you want to keep your Chocolate Brown shade as deep as possible (after this method) but retain the lustre, try use Wella Shaders & Toners Dark Brown 4.0 immediately after conducting your colour and then use very few weeks to maintain.


Wella Shaders are ‘Wash in Wash Out’ colours which add tone and some depth and are perfect for keeping a brunette shade deep without risk of build-up.Using the Plum variant will add a purple tone into the hair which can also look very effective on dark brunette bases.


Friday, 20 July 2012

The Problems with Removing Black Hair Dye


Why is Black Hair Colour Difficult to Remove?

Whether by design or intention black hair can often prove to be a bugbear many people get stuck with when using home colourants and can prove very difficult to remove.

The creation of artificial black hair is achieved by a total saturation of pigment.  Basically, the hair is quite literally stuffed with a much higher ratio of artificial colour molecules than usual.   Remember, with an artificial colourant the lighter the shade the less base pigment present in the product.  With black and darkest brown colourants the shade is abundant in a very high level of artificial pigment molecules.  With black shades these can also include the pure black molecules (which are very large) and blue.

Black Hair Colour Due to Colour Build Up

A black hair colour can also be found in colour build-up of brunette shades.  This happens when the whole hair is continually subjected to artificial colour applications, rather than just the re-growth areas.  With each application, more and more pigments are introduced into the hair until it becomes so full it can literally take no more colour.  At this point the hair will appear black – which indicates complete colour saturation. 

The Problems of Removing Black Hair Dye

Even using a hair colour remover, black shades can be notoriously difficult to remove in one go, simply because the level of pigment in the hair is high and the remover has to work extra hard to extradite all of it.  Quite often, the colour remover will become inactive whilst it is mid-way through the removal and a second or even third application is required.

Removing only one application of a pure black colourant from the hair can be easier than people think, simply because the colour molecules have entered the hair at the same time.  The big issue is removal of colour build up.  Here the colour molecules can be sitting within the hair in layers and are of varying ages, therefore it’s quite common for a colour removal application to be required for each of the colour layers the hair has been subjected to during its lifespan. 

Top Tips on Removing Black Hair Dye

Work with Clarified Hair

Always clarify black hair several times before attempting to remove to make sure any barriers are shifted from the hair.  These barriers can quite often prevent a colour removal from working at all. To clarify hair you need to use silicone free products, something like a baby shampoo works well.

It takes time

On long term black use, don't expect the black shade to be removed in one hit.  Instead, try applying the remover once every couple of weeks to take a layer off at a time.


Black Colourants Contain Peroxide

Remember, with black colourants come peroxide.  Therefore, built up shades could reveal a coppery lightened base that will start toward the root and expose further down with each colour removal application until the ends reverse. 

Temporary Colour Camouflage

Use a product like Clairol Nice and Easy Level 1 (8 Wash) in medium brown to cover revealed copper whilst you are in a period of removal.  The Level 1 Nice and Easy has no peroxide or ammonia and will create a shade which will fade with washing.  Therefore, you can top it up in between colour removals and until your permanent black shade has been completely reversed.


Stripping black hair is ineffective for revealing a very light base.Simply because the pigment is so abundant the stripper has to work much harder.  It will quite often strip to a rusty brown shade.  However, if you just want to go to a deeper brown shade, you can strip the black and re-colour immediately with a 4.0 or 5.0 (medium and light brown) to achieve a rich true brown.

Silicone Damage will Cause Removal Problems

Some hair colourants use high amounts of silicone and if you use heat or irons on the hair this silicone can melt and cause the hair colour to become permanently trapped.  Silicone damaged hair will have a slightly synthetic appearance and the black does not shift with a remover, stripper or bleach. You will need to reverse this damage before any subsequent treatments can take full effect. I'll write a full post about silicone damage soon.


Friday, 13 July 2012

Home Balayage Step by Step Tutorial: Medium to Light Brown Bases

Balayage is a technique which has been used for nearly 40 years in many of the top salons in Paris and Beverly Hills.  It involves the direct brushing of either a colourant or lightener onto the hair without the use of a cap or foils.

This Balayage technique works best on natural (non colour treated) hair.  However, using Decolour Stripper, the Balayage method can now be used on colour treated hair to partially strip hair colour prior to recolouring to effectively create a multi-tonal base in a soft, natural way.


DIY Balayage Tutorial for Medium to Light Brown Hair

This tutorial is designed for current medium to light brown bases who want to achieve a natural medium blonde base (either cool or warm). Please refer to the end of this blog post for my notes on DIY Balayage on brunettes and black hair.

You will need


How to Create Balayage Hair at Home

Make sure the hair is clarified (washed with a sulphate & silicone free shampoo such as baby shampoo) to ensure it's 100% free of styling products and conditioning residue, this will allow the treatment to work fully. Most importantly dry hair into your usual hair style, this is crucial to ensure good positioning of your balayage. 

Home Balayage Tutorial Preparation 
  1. Mix only 50% of your Decolour Stripper elements in the tint bowl and ensure only the tip of the tint brush is dipped into the product. You can keep the remaining 50% of product in their separate containers and save them for another treatment at a later date.  
  2. Working on dry hair, use the pointed end of the tint brush and segregate a thread (about 1cm wide) of hair from the front of the parting.  Pull the thread outward and starting at the end of the hair section, begin coating in the Decolour Stripper, working up the section and applying slightly less stripper at the root area. Go Along the parting and continue creating these streaks.
  3. Once you have applied the threads along the parting, begin using the tip of your tint brush to pull out and coat slightly thicker sections of hair in the stripper (1.5cm-2cm wide) from underneath your parting. Again, apply the stripper to the mid lengths and ends of the section first and apply less to the root area.
  4. When choosing chunks to coat on the underneath of your hair, you can coat sections as wide as 3 cm if you wish.
  5. Work through the hair taking these slightly wider sections from both the sides and the back of the hair.
  6. Once you have applied the stripper to your sections, do not comb through as you want to leave a lot of your darker base intact.
  7. Once applied, leave the Decolour Stripper to develop on the hair for between 45 minutes and 1 hour before rinsing as instructed.
  8. Once you have developed and rinsed off the Decolour Stripper, fully towel dry the hair.  You will now notice the overall colour looks streaky and the tone may be warm, this is normal.

You have now created the base for your balayage look, next, you need to select the correct shade of permanent hair colour for your desired look, below are some suggested colours that you might like. Further instructions are below.

TOP TIP If you are prone to warmth and do not want to display a golden tone in the finished result always select a colourant with ash tone as your ‘camouflage’ shade.


What is a Camouflage Shade?

Camouflaging is a method of applying a permanent hair colourant to a pre-lightened, highlighted or Balayaged base to deepen the lightened areas but retain any deeper (unlightened) parts. Camouflaging mutes the overall colour and creates a richer multi tonal result without hard edges as seen when the hair is just lightened and left.

DIY Balayage Selecting the Correct Shade


Blonde Hair Colour Suggestions

DIY Balayage on medium to light brown shades wishing to go blonde with their balayage, might want to take inspiration from one of these fabulous ladies from Elle's honey blonde to J-lo's ash blonde.
Red Hair Colour Suggestions

If you want to be bold with your colour, why not go for a red shade? Here's my colour recommendations for auburn to vibrant red shades.Whether you want a subtle, Isla Fisher red to a vibrant, striking Rhianna red, here are some suggestions.
TOP TIP: If you need a hand choosing the right hair colour for your requirements, this is an easy way to understand what that shade aims to achieve in your hair colour. 
Natural = will mute warmth but retains tones already present in the hair.
Ash = neutralises warmth and creates a natural looking blonde.
Golden = Adds to the gold already present to create a soft copper effect.
Copper = Creates deep, warm copper shades.
Red = Creates vibrant red.
DIY Balayage Tutorial: The Hair Colouring Stage


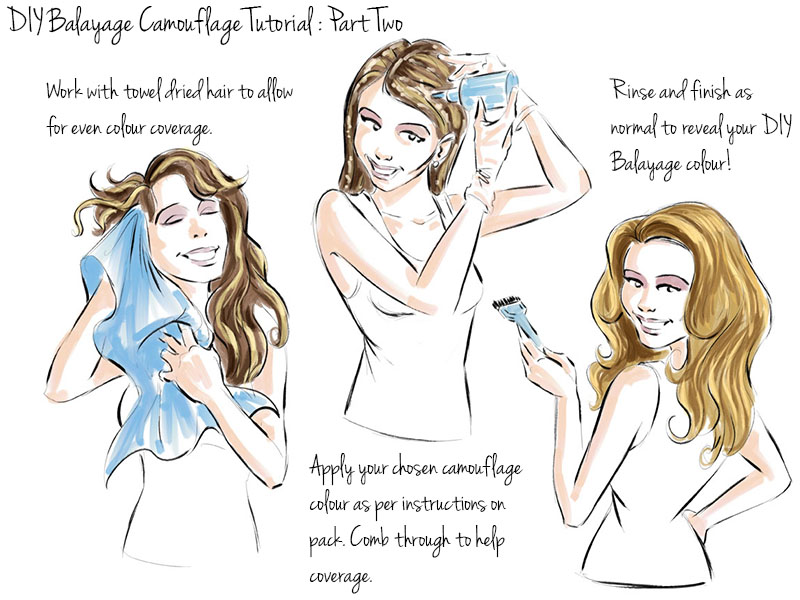
  1. Mix and Apply your camouflage colourant as per manufacturers instructions, apply to towel dried hair as this will enable the product to cover the hair evenly. 
  2. Comb the colourant through the hair to ensure your whole hair is fully covered in colourant.
  3. Leave the product to develop as per manufacturers instructions, rinse and finish.
  4. Dry and Style your hair as normal. 
  5. Your Balayage Stripping is now complete!
If you wish to build a lighter base and create further multi-tones in the hair, wait 4 to 6 weeks and repeat the process.

DIY Balayage on Dark Hair Colours


If you apply this technique to a deeper medium or darker brunette or natural black shade you need to remember to re-colour only with brunettes shades with a 6.0 (dark blonde), 5.0 (light brown), 4.0 (medium brown) and 3.0 (dark brown) base level.  If you are currently very dark and attempt this method with the colourant shades outlined the result will appear streaky as the chosen colourants applied will be too light for the level of pigment removal you can obtain during your Balayage Stripping.